
Today's post is part 2 by my guest writer and hubby, Dan, who builds my frames. Enjoy his how-to!
In Part 1, I went over selecting lumber, securing the rails to the sides, cutting, and gluing the whole thing together.
After taking the frame out of the clamps, I sand the corners. How much sanding (planing etc) is necessary depends on how well the gluing went. I level the top and bottom and sand until the two sides meet exactly at the corner. I put a couple of screws in each corner to strengthen the joint. I prefer to screw from the top and bottom, relative to how the frame will hang, so the plugs don't show. I mark my two spots 3/4" from the top and bottom and 5/8" from the corner. I made a pencil jig to speed things up.

Then I pre-drill and countersink. Note that I have the drill at a slight angle because of where the mark is. This is so the screw's further from the corner where there's more wood. I use #6 1 1/4" screws. Countersink deep enough for the plugs to have something to glue to, but not too deep. You might want to practice on some scrap.

I use some scrap from the end of the same board and cut plugs for each hole. Put glue around the end of the plug and tap into place. Remember to use stainable glue if the piece is to be stained. Wipe off the excess glue.


When dry, I cut off the the ends of the plugs with a flush cut saw.

At this point, I pre-mount the canvas or panel so that Terry can start on the piece when she's ready (and make sure it fits. I built one the wrong size once). I wedge the canvas into place, drill through the underside of the rails into the wood of the canvas or panel edge and screw into place with the appropriate length screws. Then take it back out, and mark the canvas and the frame (I notch the frame since paint covers up a pencil mark) so you know which way to put it when mounting the finished piece. Pre-mounting keeps me from having to hold down the freshly finished piece. When the painting is finally ready for mounting I position it carefully and the screws "find" the holes, drawing the canvas down without touching the surface to hold it.


I flip the frame over and spray the back with matte black. Keep the spray can inside the perimeter of the frame. A little over-spray swirls around and gets on the sides but sanding takes it off. If you prefer you can hand paint the back after the varnish.

Now comes lots of sanding... Progressively finer grits: 80, 120, 150, and 220. Don't skip any if you want a nice finish. When I think it's done I take the 220 and round the edges very slightly so they are not so fragile. Clean it up good with a compressor if you have one and a clean cloth with denatured alcohol on it. Wipping with alcohol also gives you an idea what the piece will look like finished and sometimes exposes spots that need more sanding.
I finish with Tung Oil. I use small squares of clean cloth to rub it on and disposable nitrile gloves so there is no clean up. (Just toss the cloth. I hate clean up). After two coats I sand lightly with 320. If you stain the frame use EXTREME caution with the sandpaper. If you sand the stain off a spot or an edge you will be… Annoyed >:/ trust me.
I apply once or twice a day until I like the finish, sanding at least once more before the final coat. Rubbing on the Tung Oil very thinly takes a lot of coats (8-12) to finish but each coat doesn't take long with no clean up and I don't have so much problem with drips on the vertical surfaces like it did with everything else I tried.

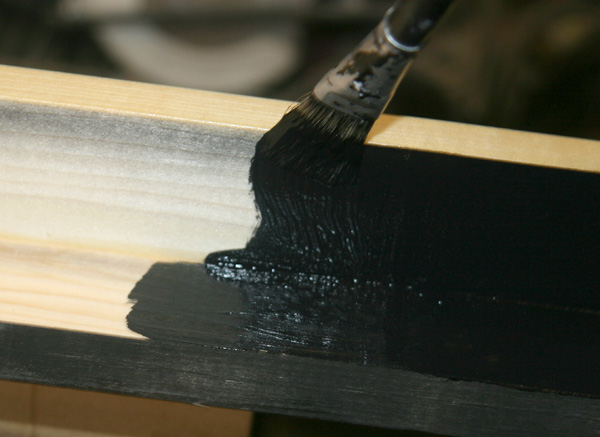
I hand paint the inside with semi-gloss black.

Screw "D" rings to the back and wire with stainless steel mirror wire because they are a bit heavy. Add felt dots to the corners so the black paint does mar the wall.

Example of a Red Oak frame with the painting mounted. Note that with the wire mounted on the recessed rails, the top of the frame does not hang off the wall like most frames.

Enjoy!
Tools:
- Parallel frame clamps and blocks: Bessey version at Rockler
- Plug cutter 3/8": Plug Cutter set at Rockler
- Flush cut saw - Stanley 20-331 - Amazon or Home Depot
- Clamps - the one handed pistol grip kind are handy so you can hold things in position. Like these: http://www.rockler.com/product.cfm?page=30241&site=ROCKLER or Irwin Quick-Grip
- Counter Sink bit: Countersink bit from Rockler
- Screws - #6 Square-X Drive Lube Finished Screws
- Sander - I use a standard 1/4 sheet sander.
- Miter saw - precise cuts are critical
- Variable speed Drill
- Wood Glue - have the right kind for your project
- Sand paper - Grits: 80, 120, 150, 220, 320
- Tung Oil - Minwax Home Depot
- Assorted common hand tools: Tape measure, ruler, hammer, center punch, square, pencil.
- Other tools that sometimes come in handy: block plane, wood chisels

hi very nice blog and so cool information.. How much sanding (planing etc) is necessary depends on how well the gluing went. I level the top and bottom and sand until the two sides meet exactly at the corner.
ReplyDeleteWhat depth do you use compared to the size of the canvas? I mean, how wide are the boards for the frame in relation to the size of the painting. It looks about double the stretcher thickness or more?
ReplyDeleteThe frames are 3.5 or 4 inches. The important thing is that the shadow box stands out in front of the painting by 1/4 inch. The rail on which the painting will be glued to is positioned so that the frames sticks out in front of the painting by that much. That is to protect the painting should it fall face down. Thank you for being a reader! Good luck with your frames.
DeleteAlso check out the first post in which Dan talks more about the positioning of the rails. http://www.terrystricklandart.blogspot.com/2012/06/how-to-build-floating-shadow-box-frame.html
Delete