Surprise this week, I have a guest writer.
My husband, Dan, framer extraordinaire, has documented his process for you. I thought my collectors would enjoy knowing what goes into the frames, and some ambitious and handy art types might want a step-by-step guide. We call the frames a Labor of Love, (you'll see why). Dan has been asked many times to build them for other artists and he says they couldn't pay him enough. Part 2 will be published in next Tuesday's post.
 |
| Dan working his magic in the basement. Mad Science, 19x24, oil on canvas over panel |
Hit it Dan:
I first got into the frame building business because of Terry's vision for the Awakening Series was a sort of modern reflection of Gothic altarpieces. Not something you can find at the art supply store.
See:
Awakening Gallery and
Blogpost about Awakening series
When she began working in traditional rectangular shapes she was looking to frame her pieces in a way that bridges the gap between traditional wood framing and the modern minimalist aesthetic. She also did not want the edges of the painting touching the frame. The answer we came up with is the floating frame that Terry is using on many of her works. Terry paints on cradled panels or canvas stretched over hollow core doors cut to size (another post perhaps). The painting rests on a rail and is screwed down from the back. Only the back of the painting touches the frame.
I have been told my frames are more like furniture than picture frames. I think they add to the monumental quality of Terry's paintings.
Frames (with some pretty nice paintings)
Robert Lange Studios, "Women Painting Women" exhibition, Nov 2010
I have built somewhere in the neighborhood of 90 of these frames over the years, so Terry thought that it would be good to share
how it's done. At the bottom is a tool list with some information about tools that most people might not have.
I start with selecting lumber. For the sides (the part that shows), I mostly use
1" by 4" Poplar because it's easy to get, light, and easy to work with. With this design the frames dimensions are 2" larger than the artwork. If the frame is too big to get from a single board, I get two pieces that match as closely as possible, looking for interesting (and simular) grain. The straighter and cleaner the boards, the easier it will be, so if the wood doesn't look that good, I try somewhere else. When using two boards I try to get opposite sides out of each board.
For the side rails I use 1" x 2" pine if I can find straight ones. Sometimes I get nice 1 x 4s and spit it on the table saw.
Note my nice large work table. It's a sheet of 3/4" MDF covered with a sheet of 3/4" plywood. I cover it with brown paper (comes in a roll from the Home Depot paint department) so that the glue, paint, stain, varnish, etc. does not build up on the table surface or have to be scraped off. I just peel it off and put down new paper between projects or whenever I need a clean surface.
Now I
glue the 1 x 2 rails to the sides. Make sure the side board is lying flat. If you are not careful you can glue a curve into a nice straight board. The objective is to have the surface of the artwork float 1/4" below the edge of the frame, so attach the rail the appropriate distance from the top edge. Place a bead of glue along one edge of each rail, position carefully and clamp about every 18 inches (more or less depending on how tightly the boards are meeting. When you're done, check it again. Sometimes the boards move as you clamp elsewhere. Wipe off excess glue. Let it dry at least an hour before unclamping.
Cut the sides to length with 45º angles (my saw locks precisely at 45) using a miter saw, exactly 2" larger than the artwork.
This makes the gap between the art work and the sides 1/4". It is very important that they be exactly the same length with precisely cut angles. Clean any sawdust off the base before positioning the board. Make sure the piece is flat and tight up against the back of the base of the saw.
I put a screw at each end of the rails to make sure the glue joint never comes apart. Chose a screw length and countersink depth to get the screw 1/2" into the side rail. I like square drive or torx screws. They don't slip like phillips do.
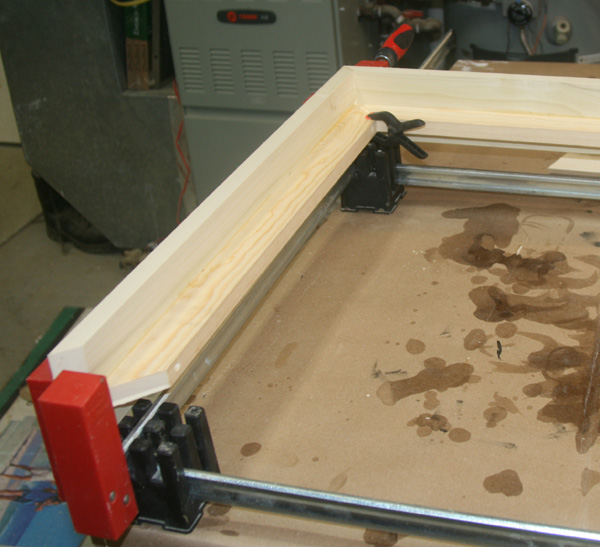
I use a Bessey parallel clamp system. It was a lot more difficult when I first tried to do these with regular pipe clamps. I
position the blocks and clamps and make sure they are square.
Generously smear glue on both ends of each board as you add them to the rig. Use stainable glue if you are going to stain it. End joints suck up a lot of glue, it's messy but don't be stingy. You don't want a dry joint, ;)= dude. I use little plastic spring clamps to help hold the joints in place while I get all the boards placed.
When all the boards are in place,
slowly and carefully tighten the clamps, keeping all the corners level, and meeting precisely at the corners. Wipe as much excess glue as possible and check it again! Sometimes the joints creep. It is more important that the sides meet nicely than the rails. Sometimes the lower of the two clamps doesn't push the top of a joint together perfectly, so it's good to have some extra clamps you can put across the top.
Check that the sides are parallel and frame is square. If not, do whatever it takes to get it close anyway (this is always a good occasion for colorful language). If the wood is straight, you have cut accurately and joints have come together nicely, this is (almost) never a problem.
I
let them dry in the clamps about 2 hours. Below is a nice joint, fresh out of the clamps.
Next time on Part 2 I will finish the project.
Tools:
- Parallel frame clamps and blocks: Bessey version at Rockler
- Plug cutter 3/8": Plug Cutter set at Rockler
- Flush cut saw - Stanley 20-331 - Amazon or Home Depot
- Clamps - the one handed pistol grip kind are handy so you can hold things in position. Like these: http://www.rockler.com/product.cfm?page=30241&site=ROCKLER or Irwin Quick-Grip
- Counter Sink bit: Countersink bit from Rockler
- Screws - #6 Square-X Drive Lube Finished Screws
- Sander - I use a standard 1/4 sheet sander.
- Miter saw - precise cuts are critical
- Variable speed Drill
- Wood Glue - have the right kind for your project
- Sand paper - Grits: 80, 120, 150, 220, 320
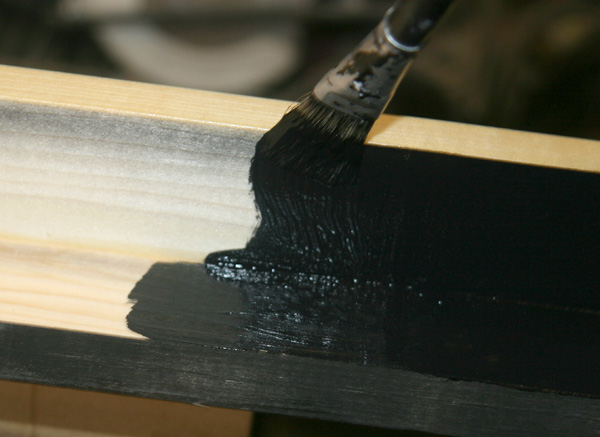
- Tung Oil - Minwax Home Depot
- Assorted common hand tools: Tape measure, ruler, hammer, center punch, square, pencil.
- Other tools that sometimes come in handy: block plane, wood chisels


.jpg)