Tuesday, March 20, 2012

Painting a Head Study, Part 6, Final

This was the last day to work on this project for my class. If you are just joining in, the other postings are here:
Part 1, which dealt with griding, drawing and the rub out under painting stage.
Part 2, which included premixing a flesh tone palette and storage of paint;

Part 3, in which I explored oiling out, and the pros and cons of working from photographs

Part 4, a session of discoveries and surprises.

Part 5, noticing color shifts and tips for accurate drawing. 

I worked on this with the class, on the upper lip, lips and neck. I knew it wasn't going great. I was having trouble with the chin and the shadow under the chin. I demoed for about an hour, then turned them loose on their own work. It's amazing how tricky it is trying to explain what I'm doing, answer questions, paint, see, all while trying to stand to the side so they can see.

A few days later back in the studio I could see that I had shortened the model's chin.
So I used one of my favorite tricks, flipped it upside down and got medieval on it. About 2 hours later I considered it passable.
There are so many things I could keep working on, more subtle corrections to the drawing, softer transitions between shadow and highlights, reflected lights and shadows, and the PEARLS!

But alas this is just a study, and it's time to move on. This was the first head study that I've ever done from start to finish with a class and it has been a huge learning experience for me.

I'm so proud of the work they have done. For some of them this is the first face they've ever painted, some had never picked up a brush until a few months ago, some have only been painting abstracts or impressionistic work until taking my class in the past few months.

We have all been "lingering in the uncomfortable zone" where real learning takes place and it's been a blast! With their permission I'm sharing a few of them here. Their work is in varying stages of finish.
Dru Griffith

Ira Turner

Janie Chambers

Laura Nigg

Paul Brooks

Suzette Shell
Jamie Wilson
My favorite part is that they all look different, they all have their own voice that is coming through and I encourage that. The basics are the same no matter the style. Value, color principles, edge control and accurate drawing are important fundamental skills that can be built upon.

If they master these principles, they may choose to discard them later to embrace another style. If they do so it will be because they choose to and not because they are limited in their knowledge and skill.
 
My philosophy is that these are tools for the tool box and the more you have the easier it is to create the vision in your head.

Monday, March 12, 2012

Painting a Head Study, Part 5

This is my fifth installment, thanks for hanging in there! If you missed any of the others, here are links for the first 4.

Part 1, which dealt with griding, drawing and the rub out under painting stage.

Part 2, which included premixing a flesh tone palette and storage of paint; 

Part 3, in which I explored oiling out, and the pros and cons of working from photographs

Part 4, a session of discoveries and surprises.
In this session I painted the right ear, the cheek, earing and finished up the nose. 

As always, I made corrections to the drawing as I painted. The ear and the side of the face were still too wide.

A few things I noticed and tried to capture:
~a pink color in the cheek, and a more golden color lower on the jaw

~nostrils are a mixture of umbers and permanent madder deep and there always seems to be light shining through the nose that keeps it a warm reddish color.

~there is a beautiful, warm light reflected off the cheek onto the underside of the nose on the left side of the face.

~I stopped painting before I got to the edge of the lip since I didn't want to demo for too long. I like to stop for a session in the interior of a form rather than at the edge of the form. I don't want a build up of paint on the edges of things like lips.

~it's best to soften all edges at this stage and spend a good deal of time moving paint back and forth at edges. Soft edges visually turn in space. 

~the paint is a little choppy on the middle of the cheek but it does let you see the direction of the brush strokes. I generally brush across a form to describe the mass.
A few tricks to help with accurate drawing:
~Turn the painting and your photo reference upside down or on it's side to see it with a fresh eye. For some reason that helps to see things in shapes rather than as an eye or a nose and for that reason you can see it more accurately.
~Look at it in a mirror. I have a small, hand-held mirror that I glance at over my shoulder, or I haul it in to the bathroom where there is a large mirror.
~See the painting reduced. A student gave me a reducing glass but you can also take a picture of it and look at the reduced version. Even a phone camera works for this.
Till next week when I hope to finish this up!

Monday, March 5, 2012

Painting a Head Study, Part 4

This is the fourth in a series I'm doing with my oil painting class on Tuesday mornings. If you are just now joining in check out:

Part 1, which dealt with griding, drawing and the rub out under painting stage;

Part 2, which included premixing a flesh tone palette and storage of paint;

Part 3, in which I explored oiling out, and the pros and cons of working from photographs.
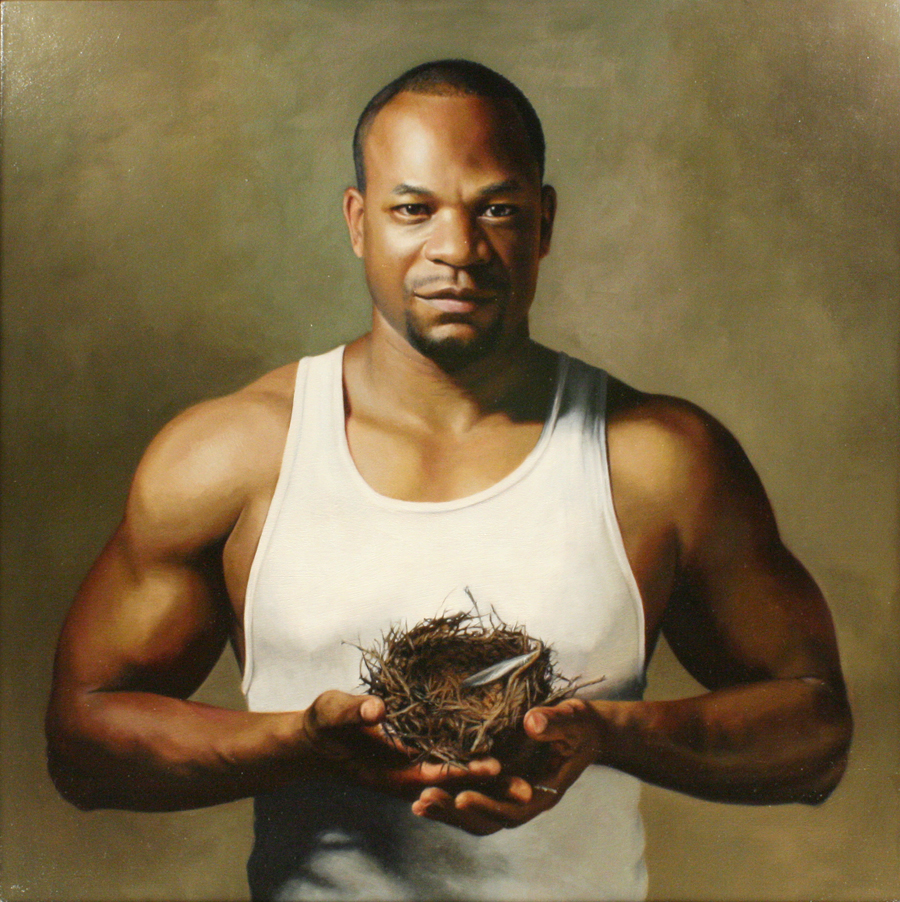
I worked on this about 45 minutes in class, then continued working on it another 2 hours after I got home. 
A few surprises and discoveries happened this session.
Discovery # 1:

Last week I had worked on the forehead and one eye in class. Normally I work on both eyes simultaneously, but in the interest of not demoing too long that's how it worked out.

Turns out -- not a good idea, it's far too easy to get them looking googley. (official art term). Initially, after my 45 minutes painting in class, I had one too low and one too high, slightly, but in a face that is a significant error. Without time constraints I try to do the initial pass on the face in one day.

Discovery # 2:

I'm constantly trying to figure out better ways to teach what it is that I do. During class last week I noticed a common error. I found myself saying repeatedly, "Your shadows aren't dark enough" as I went easel to easel. It must be something I wasn't getting across. The search for a solution led me to a slightly revised palette.
I initially mix up the most chromatic mid-tones that you see circled here, then add white to each color string to create at least 4 values (follow the down arrow).

My method up to now has been to just have a big pile of darks in the lower right of my palette that I will mix these mid-tones with for my darkest flesh areas.

After seeing my students struggle a little bit with this I decided that the colors strings should continue on to include the darks (follow the up arrow).

After seeing this I'm surprised it hasn't occurred to me sooner, it seems so obvious. I was doing the mixing of the dark colors more by instinct than by method. This is going to work so much better, for me and for my students!

The important thing is to mix from the mid-tones to the dark and the mid-tones to the light. The mid-tones do not include white. 

Once white is in a color pile I do not use it to make a dark, I consider it contaminated. If I want a darker color I go back to the original, unpolluted color, which I think of as pure color.

This is the best way I've found to keep flesh tones from being chalky and to have nice clear transparent shadows.

Discovery #3:
Apparently keeping your painting in a plastic tub with a lid will slow down drying time, who knew? This was yet another obvious thing I hadn't thought about before in terms of painting.
When I oiled out the part of the painting I'd done the week before, it was still wet and the forehead smeared. I looked at my class and said, "What the bleep?" After a week it most definitely should have been dry.

After a little discussion, we decided that it was the Rubbermaid container, a homemade wet canvas carrier, that I carry paintings back forth to class in. I had not taken the painting out during the week. Mystery solved.

I'm learning so much from my students and am grateful to them every week for helping me make these discoveries!

I've written before about the necessity of mistakes in the learning process. Maybe it helps to think of them as discoveries. Relish them and recognize them as the stepping stones they are.

They will get you where you want to be and if you're like me it's simply better. Not much of a finite destination but one heck of a journey!

I invite you to checkout the catalog for The Expedition and Beyond, a group show I'm in next month at Principle Gallery in Alexandria, VA. Enjoy.
The Expedition and Beyond
58 pages, published 1 MAR 2012
The Expedition and Beyond- Work by 13 artists, introduced through the Women Painting Women phenomenon of 2010, who continue to be challenged and inspired by each other. They come together once again in a show at Principle Gallery, Alexandria, Va, April 2012. Foreword by John O'Hern, American Art Collector, Santa Fe editor.

Wednesday, February 29, 2012

New from Matter Deep Publishing

There's so much going on today with our family publishing company!

The Expedition and Beyond Catalog is online and ready for purchase,
The Expedition and Beyond
58 pages, published 1 MAR 2012
The Expedition and Beyond- Work by 13 artists, introduced through the Women Painting Women phenomenon of 2010, who continue to be challenged and inspired by each other. They come together once again in a show at Principle Gallery, Alexandria, Va, April 2012.

and my daughter-in-law, Amy Strickland's novella Kissing Corpses is free for today, Happy Leap Year. This is Amy reading the first chunk of her book.


Never fear if you missed the freebie for Happy Leap Year Day, it's only .99 the rest of the time.

Here's more about The Expedition and Beyond. Here's Amy's website so you can see what all she's getting into. Here's my daughter, Carly Strickland's website, she's our designer.

Tuesday, February 28, 2012

Painting a Head Study, Part 3

This was the third session with my oil painting class working on this head study. If you're just now joining in, here is Part 1, and here is Part 2.

Before I began painting I did an oil out using a bit of Res-N-Gel, odorless mineral and linseed oil. This is a couching layer to restore the color to it's wet look and help the previous layer accept the new paint. I only oiled out the area previously painted.
It seems to be going slowly but I'm spending only about an hour demoing. Then the class has time to paint and I go from easel to easel answering questions.
As I work I try to see in planes, modifying the color subtly as I go. I only worked on the section I thought I would get to that day, the forehead, hairline and eye.
Lyndsey, original reference
For the kind of work I do, I find working from photos is necessary. It has positive points and negative points.

On the positive side:
~The model doesn't move, the artist isn't shifting around so the view doesn't change
~The image is already flattened so there is no translation from 3-D to 2-D
~One can capture a momentary expression that a model cannot hold for hours.
~Model fees are less expensive

On the negative side:
~Because the image is already flattened the painting could look flat.
~If the original photography or print is inferior, there won't be  good or accurate information to work from and the painting could be lacking.
~Working from a photo puts more distant between the artist and the model which some artists find less fulfilling. (Let's face it staring at a print or a computer monitor is not as fun as having a model to interact with)

However, there are things one can do to counteract the few negative aspects of working from photographs.

~Work from life as much as possible. It will help fill in the blanks so to speak when a photo is lacking. That life experience will come out in the paintings.

~Have long and fun photo shoots with the models. I find myself remembering our time together while I'm working on a painting. It's much like remembering an experience you've had when you hear a song or smell a certain scent. Enjoy those sessions and pay your models well as you will most likely get several paintings from each one.

~Paint people you know, then you can stare at them over dinner to figure out that extra little something that's missing in the photos. (My kids and husband love it when I do this)

~Watch people closely and pay attention to how light affects the color of skin, shines through ears and penetrates irises. (People might think you're a creeper but it really pays off in the studio)

~Have models come back in to model a part that needs clarification. (Or use another model, my husband has modeled the hands on several paintings including The Ascent)

~Invest in a good camera and learn how to take the best pictures possible.

~Use a software program like photoshop to help get the most out of the reference pictures.

Enjoy, see you for Part 4.

Monday, February 27, 2012

My New Black Velvet Matador Painting

I had an entirely different post planned for this morning but just had to share with you the awesome present my family pitched in on for my birthday.
"Gold Cap #106", 3'x5', Vintage Black Velvet, 1960's-70's

Tuesday, February 21, 2012

Painting a Head Study, Part 2

In the second session with my oil painting class, I demonstrated premixing a palette that we'd be using for the flesh tones, the background and the hair. If you missed it, here's Part 1.
I'm a firm believer in premixing strings of color, it takes a little patience, but I think it pays off when you get into it.
I started with the background and worked forward, and in adjacent areas so that I could have good control of the edges.

I store my paint in a Masterson plastic palette with a cover. It's then wrapped in a trash bag and stored in the freezer. The paint will still be usable at our next class so all the mixing time and paint will not be wasted.

My understanding is that a home freezer doesn't get cold enough to actually freeze the paint but slows down the oxidation process which is what actually dries oil paint.

There is debate among artists about this but it makes sense to me. What everyone agrees with is never freeze your brushes or a painting! The cold will adversely affect your painting surface, the wood in the brushes, etc.

Be prepared to have your family complain about losing freezer space, a mini turf war of sorts. Especially when you have multiple palettes in there. (I'm up to three). The war generally fades to a rumble if you have your defense prepared.  Go on long enough about saving time and money and you shall prevail!

Sunday, February 19, 2012

Voice of the Tiger, Step-by-Step Oil Painting Video

I recently reworked a video of my in-progress slide show of Voice of the Tiger. It now has a voice-over with thoughts about my painting process. Enjoy!

Friday, February 17, 2012

The Expedition and Beyond at Principle Gallery Video

This week was (between painting sessions) about putting the finishing touches on a preview video for the Women Painting Women, The Expedition and Beyond Exhibition at Principle Gallery, which opens April 13, 2012 and runs through May 15.

Catalog is available if you can't make it to the show. Preview catalog.


Here's a complete list of artists that will be in the April show at Principle Gallery:
Mia Bergeron,
Linda Tracey Brandon,
Rachel Constantine,
Alia El-Bermani,
Diane Feissel,
Catherine Prescott,
Cindy Procious,
Shannon Runquist,
Kate Stone,
Terry Strickland,
Stefani Tewes,
Alexandra Tyng,
Sadie Valeri

Hope you enjoy and share away!

Monday, February 13, 2012

Painting a Head Sudy, Part 1

I've started a new project with my Tuesday class. We are doing a head study working from a photo. This is the first time I've done this project with them, so it's kind of an experiment.

We are all working from the same photo, one of mine. I chose a mostly full front view of the face. It is classic Rembrandt lighting, in which there is a triangular patch of light on the shadowed side of the face.
I printed an 8x10 grid on a transparency to lay over the image. The grid dissects the image into thirds. This helps with the drawing, placement of the head on the canvas and of the features on the head. I think it is also helpful in learning to draw.

It helps to start to see things flattened and in relationship to each other. Drawing the individual shapes within one square helps to see it primarily as shapes. This shift in the way of looking at something is very crucial in learning to draw.

We first drew the image in a graphite pencil.
Next we redrew it with a Faber Castell permanent sepia pen.
I noticed (after it was drawn in the pen) that I had the right side of her face too wide, but that's okay. Oil paint is very forgiving and the marks will be covered eventually with paint. 

The important thing, listen up here my students, is to make the correction as soon as you see it! It's much better to have caught and corrected it at this stage than later after I had perfectly rendered the ear.
Next I did a rub out using Burnt Umber thinned a bit with linseed oil, mineral spirits and res-n-gel (to speed the drying). I painted in a few of the darkest areas.

My intention was for everyone to get to this stage in the first of four 3 hour classes dedicated to this project. None of the students got to this point. I spent about two hours additional after class, getting  this far. Most of them had their drawings well along. Next time I will know to leave two class sessions for this stage of the project.

You  may recognize this model from another painting. I'm excited to be painting her again.
"Cardea", 16x16, oil on canvas over panel.
She was part of my Elements series.

Here is a post I did about under painting with Gamblin Fastmatte,
And another about this under painting technique, "Aye, There's the Rub".

Friday, February 3, 2012

Would That Art Could Heal the World

I'm deeply saddened by the murders of five young African American men here in Birmingham, AL last weekend. I'm utterly heartbroken for the three African American teenagers arrested for the murders.

Like ripples in a pond, the devastation of economic inequality moves through our world. I wish that art could heal.

I post this in dedication to those 8 beautiful young men and their families.
Home, Building a Life Series, 24x24, oil on canvas over panel, 2007

LinkWithin

Related Posts Plugin for WordPress, Blogger...